NNModelling client guide
Model metavariables
Model > Manage metavariables… opens an Operations-style staged list with New,
Edit, Remove, Save and Cancel. Each declaration has Name, Type and a literal
Value. Types match stereotype parameters: integer, number, boolean, string,
dtype, json arrays and stereotype references. Names may include hyphens.
Declarations are shared across all model scopes.
Enter references/formulas directly in ordinary Inspector parameter fields:
embedding_dim = $embedding-features
times = $num-heads
in_features = $embedding-features
out_features = $(params.in_features / meta["num-heads"])
factor = $(1 / math.sqrt(meta["embedding-features"] / meta["num-heads"]))
meta["name"] reads a declaration; params.name reads a sibling parameter,
including its default. Lua expressions must return a value satisfying the
destination type and constraints; fractional integers are errors. Enter $$
for a literal string beginning with $. Every parameter has one value editor.
Boolean, choice and reference menus are editable: type a reference or formula
directly into their text area. A visible Parameters hint explains the syntax,
including nested fields. Inspector shows stored source and a resolved value/error
below it. Node cards show calculated values such as 64, never internal binding
JSON or Lua source. An unresolved value shows ? with its diagnostic in a tooltip.
Missing references, cycles and
invalid results block training, while the project remains editable/saveable.
Saving a changed declaration list creates the same unsaved history barrier as Operations. Parameter binding edits retain ordinary Undo/Redo. Projects using metavariables/bindings use schema 3 and require an updated client. Training snapshots retain authored source for restore and freeze concrete values from the same C/Lua resolver used by native analysis.
This guide describes the Qt client controls and how they affect a project. Interface labels are shown in English as they appear on screen. Graph edits become part of the project with File > Save; resource creation and dataset metadata edits save the project when the operation completes.
Starting the application and projects
In a normal desktop launch, the project chooser appears first. New project creates an empty project; New MNIST MLP and New mini LLM create editable copies of the examples; Open project opens a project folder; Close closes the chooser and leaves the main window open. The main window can therefore remain open without a project. If the application starts through the automation bridge without a project path, the initial chooser is skipped. Open it with File > New project…, File > Open project… or Training. Example model copies are independent of the originals.
Creation first asks for a parent folder, then Model ID and Display name. The ID determines the new folder name. The initial model fields start at mnist-mlp / MNIST MLP or mini-llm / mini LLM; for an empty project the ID starts blank and the name suggests the entered ID. The project version is not editable in this window. An existing destination folder or invalid ID produces a message and does not replace the active project.
File contains:
| Item | Effect |
|---|---|
New project… (Ctrl+N) |
Starts an empty project. |
New from template > MNIST MLP… |
Asks for an ID and name for a copy of the MNIST classifier example. |
New from template > mini LLM… |
Asks for an ID and name for a copy of the mini LLM example. |
Open project… (Ctrl+O) |
Chooses a project folder. Before replacing unsaved edits, asks whether to save, discard or cancel. |
Save (Ctrl+S) |
Saves the current project. An error leaves the project open and displays a dialog. With no project open it shows No project is open. |
Close project (Ctrl+F4 on Linux) |
If there are edits, asks to save, discard or cancel before closing and returning to the chooser. The shortcut depends on the platform. |
Closing the main window with unsaved edits also offers Save, Discard or Cancel. Cancel leaves the project open. The window title shows * when the project has unsaved edits.
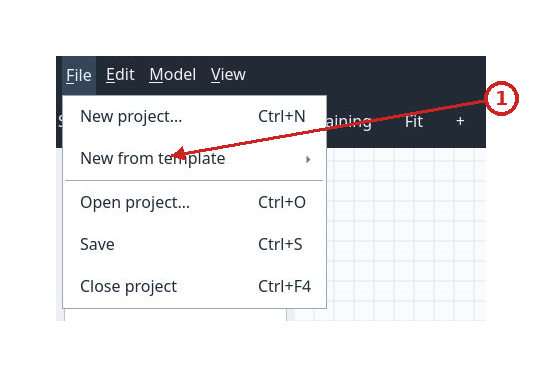
Click the image to inspect it at its original size.
- Create, open, save and close the project
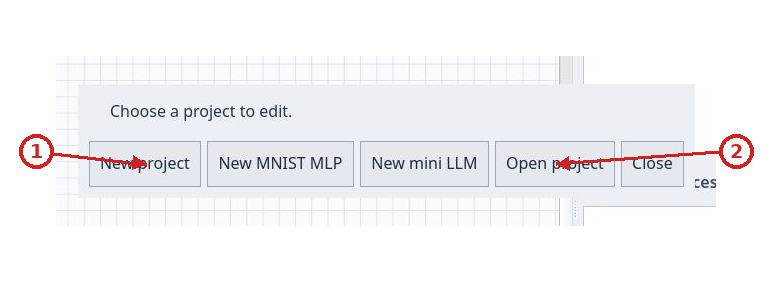
Click the image to inspect it at its original size.
- Create a new project
- Open an existing project
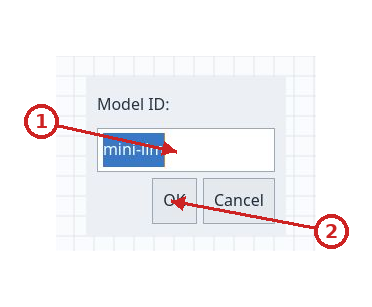
Click the image to inspect it at its original size.
- Project ID
- Confirm
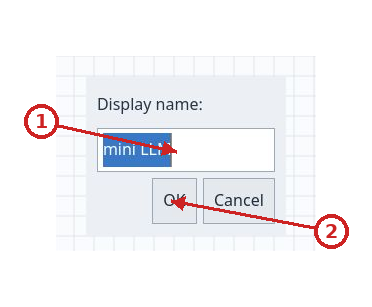
Click the image to inspect it at its original size.
- Display name
- Confirm
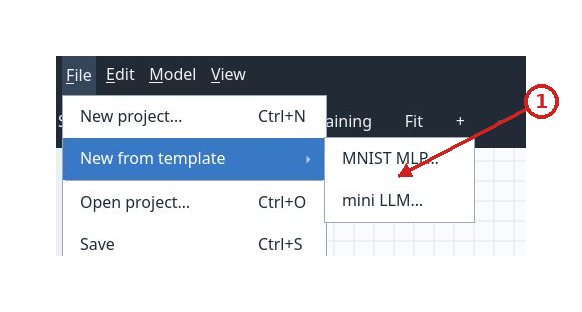
Click the image to inspect it at its original size.
- Available templates
Menus and history
Edit contains Undo (Ctrl+Z) and Redo (Ctrl+Y on the observed platform). Each item is enabled only when the project history has an action to undo or redo. Undo and redo refresh the canvas, selection, Inspector and problems. Saving and history are separate: the title loses its asterisk when the project returns to the saved revision.
Model contains Create stereotype…, Manage operations…, Manage metavariables…, Parameter counts… and Training backend…. Dataset contains Create dataset… and Manage datasets…. Authoring and management actions require a project; without one, the client suggests opening one. Training backend… opens the panel even without a project, so you can check the service and inspect jobs.
View contains Fit graph (Ctrl+0), Zoom in (Ctrl++ on the observed platform), Zoom out (Ctrl+-) and Arrange > Vertical/Horizontal. Fit graph frames the current scope and its connections without moving nodes. Wheel zoom is centered on the pointer; menu and toolbar zoom scales around the canvas center. The mouse wheel zooms in or out. The middle mouse button, or holding Space while dragging with the left button, pans the canvas. Escape cancels a pending connection or drag. Zoom shortcuts can vary by platform and keyboard layout.
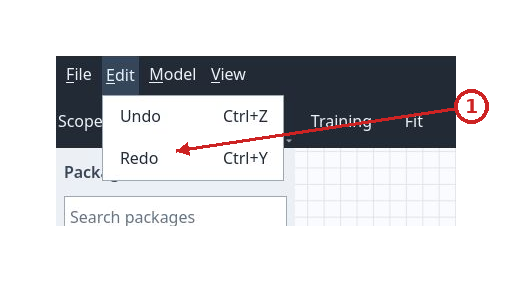
Click the image to inspect it at its original size.
- Undo and redo
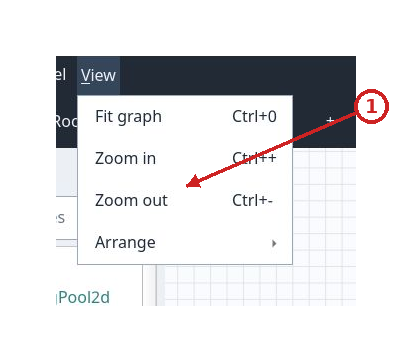
Click the image to inspect it at its original size.
- Fit and zoom commands
Graph workspace
The main window shows the Packages palette on the left, the graph in the center and the Inspector on the right. Model Problems is a collapsible tab below the canvas; click it to open or close the table. The tab stays visible and shows global error, warning and internal-problem counts, including while the scope filter is active.
Palette and node creation
Search packages filters active packages by name, ID, version and kind; the search is case-insensitive. Results are grouped under kind headings (input, layer, join, loss, output, loss-output, subflow or another available category). Selecting a leaf item selects it in the palette; Add to graph is enabled only when a project is open and a package leaf is selected. Double-clicking the leaf or pressing the button adds it to the current scope, centered in the view. Selecting a group heading does not add a node. An item uses its package color. With no project open the palette is empty; an empty new project still has the core catalog and displays its packages.
Click nodes to select them; drag across empty space to select multiple items. Qt selection modifiers add to or remove from the selection. Drag a node to move it; to move several together, select them and drag one. Positions snap to the grid. Select an edge and press Delete or Backspace to remove it; those keys also remove selected nodes and their incident edges. A subflow with children cannot be deleted until its contents have been removed. Each rejected operation displays a dialog explaining why.
To connect two nodes, drag from an output handle to the desired input handle. The dashed connection is a draft; the model accepts it only when direction, handles, scope and occupancy/cycle rules are valid. A rejected connection shows Operation rejected and leaves the graph unchanged. Permanent edges use orthogonal routes. Color distinguishes normal output flow from loss flow. Output-handle tooltips show the ID and kind.
Input, Output and Loss Output nodes are terminal circles with an outside label. An Output collects a prediction; a Loss Output collects a loss result; each accepts one connection. A complete root model expects an Output and a Loss Output; an incomplete project remains editable and can be saved. A join node appears as a junction bar. + beside the bar adds a free input handle; − removes the highest free handle. At least two inputs and every connected handle remain visible. − is disabled if it would remove an occupied input; + is disabled at the limit of 128 displayed inputs.
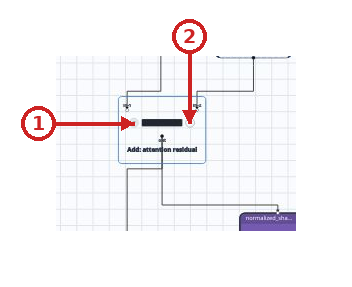
Click the image to inspect it at its original size.
- Remove an input slot
- Add an input slot
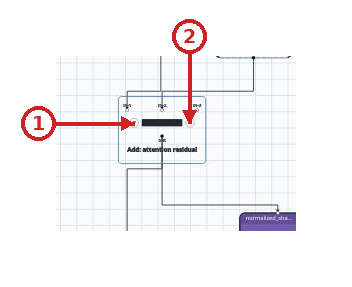
Click the image to inspect it at its original size.
- Remove an input slot
- Add an input slot
Scopes and subflows
The Scope bar opens the scope tree. Root shows the main nodes; choose a subflow to show its immediate scope. Orphan scopes collects imported scopes without a reachable container; these remain selectable. Navigation shows one scope at a time and does not move or change nodes.
A subflow card shows its child count and a prominent Enter subflow button. Click the button to open the subflow's scope. Use the scope tree's navigation arrow to return to Root or an ancestor scope.
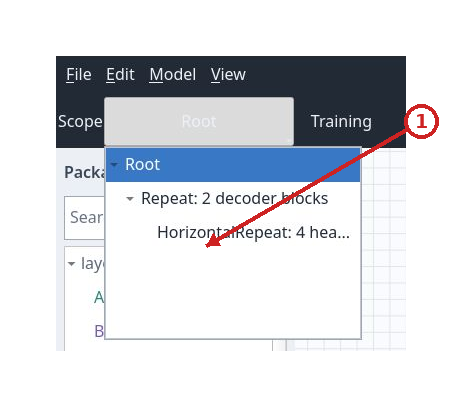
Click the image to inspect it at its original size.
- Root and nested scopes
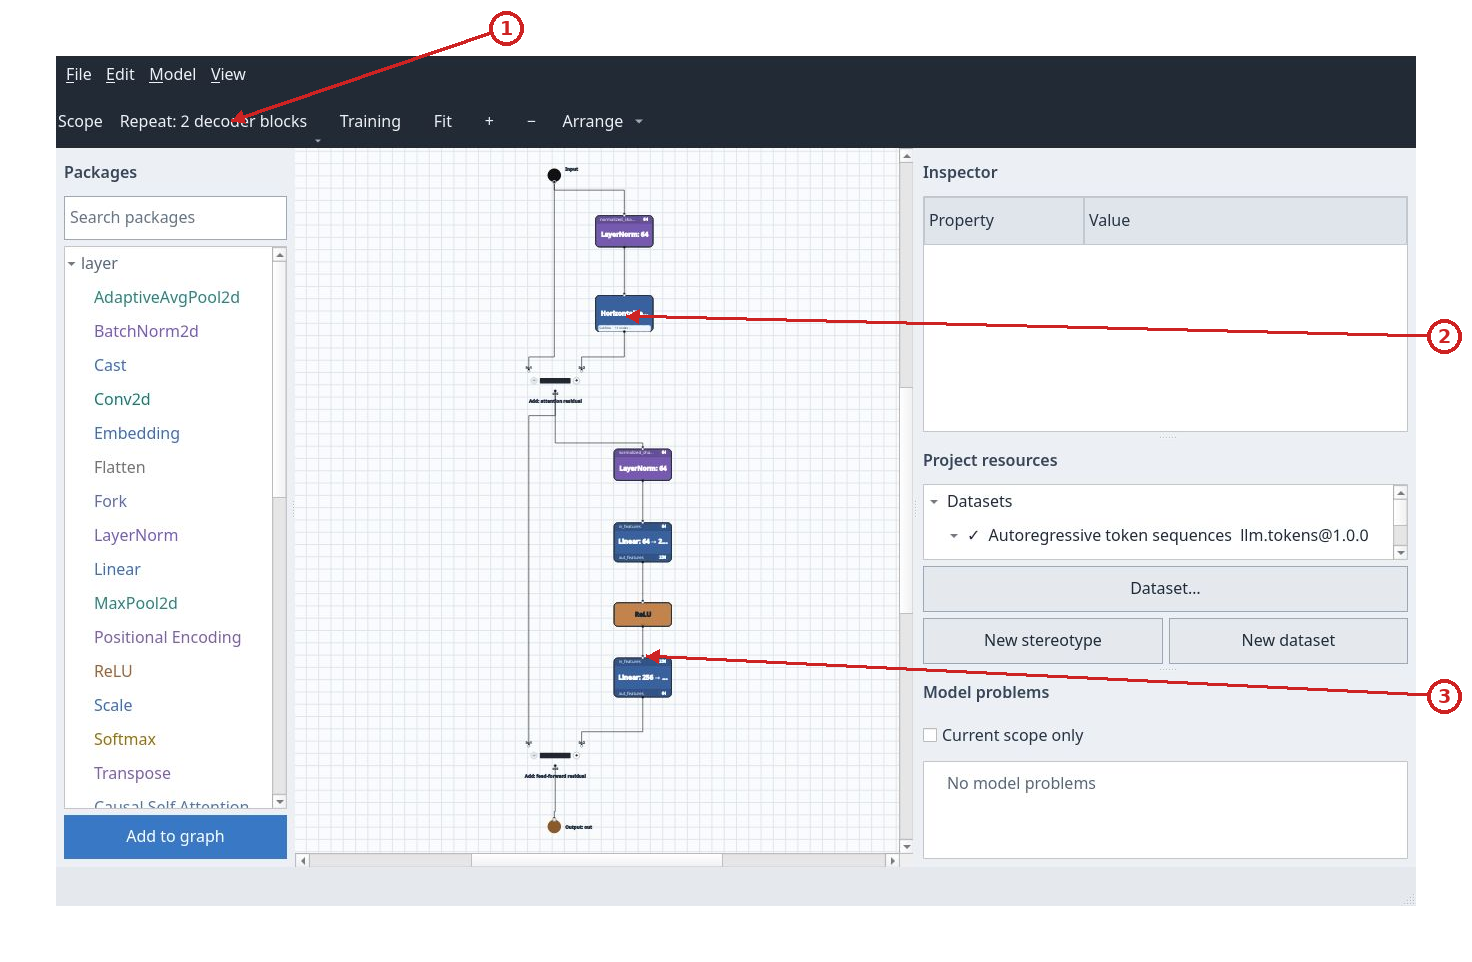
Click the image to inspect it at its original size.
- Current nested scope
- Repeated subflow block
- Projection and activation layers
Graph toolbar and direction
Delete, beside Arrange, removes selected nodes and connections. It becomes
enabled and red for a deletable selection; without one it stays disabled.
It performs the same deletion as the Delete and Backspace keys.
The Workspace toolbar provides Scope, Training, Fit, +, − and Arrange. Training opens the same panel as Model > Training backend…. Fit frames the content; + and − zoom in or out. Arrange applies the default vertical layout. Its arrow offers Vertical or Horizontal; the same choices are under View > Arrange. Arrangement recalculates node positions in the current scope, updates the in-memory project and marks it modified, then fits the result. Use File > Save to persist it to disk. Vertical flow goes from top to bottom; horizontal flow goes to the left. Changing direction is a session presentation choice; Arrange is the action that lays out and records positions.
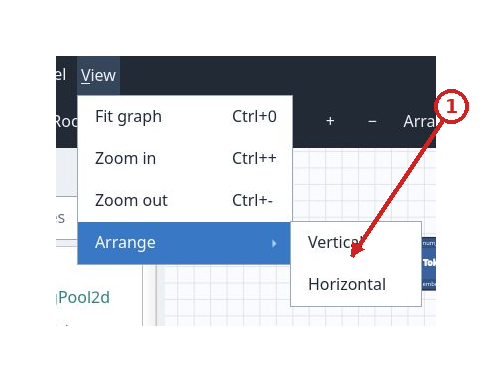
Click the image to inspect it at its original size.
- Vertical and horizontal layout
Parameter counts
Open Model > Parameter counts… with an active project. The summary shows
Total parameters, Trainable and Complete or Incomplete. The table lists
node, status, total, trainable parameters and message. Refresh uses the current
graph, including unsaved edits; Close changes no project files and starts no
training.
Counts are estimates derived from package Lua rules. Unknown/error contributions remain visible and make the total incomplete; unknown does not mean zero. Subflow totals include descendants and repetitions without adding those contributions twice to the network total. The illustrated MNIST MLP example has 109,386 total and trainable parameters.
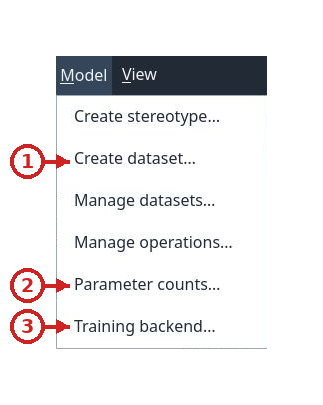
Click the image to inspect it at its original size.
- Package and resource actions
- Parameter counts
- Training backend
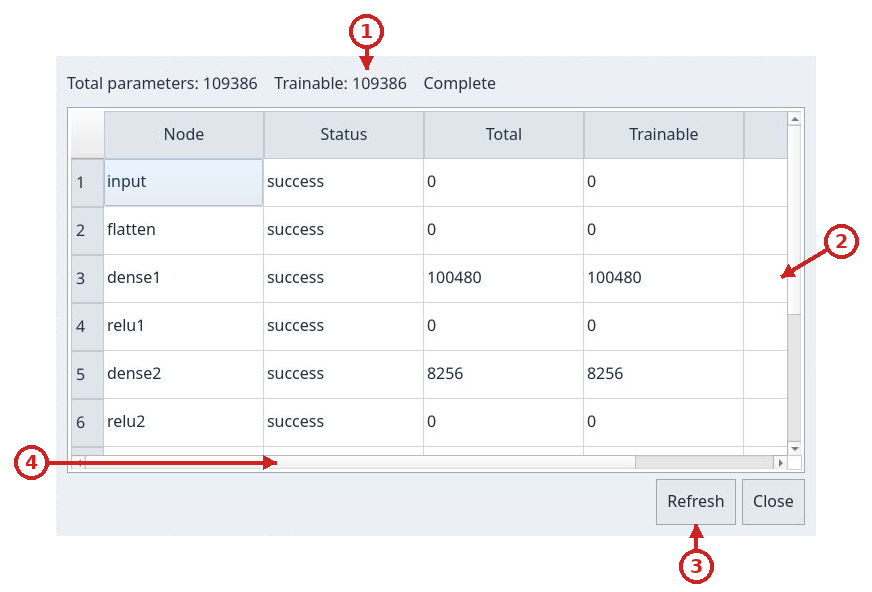
Click the image to inspect it at its original size.
- Total and trainable parameters; analysis completeness
- Parameter counts for each node
- Refresh the parameter counts
- Horizontal scrollbar reveals the Message column
Inspector
Selecting a canvas node fills the Inspector table with Property and Value columns. With no selection, the panel is empty. Name is editable; press Enter or leave the field to apply a new name. Package shows id@version; hover over the row to see the package description.
When analysis succeeds, Successful outputs lists each handle with its kind, dtype and shape. Terminals instead show Consumed tensor with the received tensor's dtype and shape. These values describe shape analysis; they do not mean that the model has been trained.
For an Output or Loss Output inside a subflow, Boundary mapping associates the terminal with an output declared by the container. The list includes only outputs of the same kind; (unmapped) appears when there is no association. An imported association that no longer matches appears as Invalid mapping: … so you can correct it.
Parameters contains one control for each parameter defined by the package:
- parameters with preset choices use editable drop-down menus;
- Boolean values use editable
true/falsemenus; - integers, numbers, strings, dtypes and JSON values use text fields, validated by the package when you confirm the field;
- parameters placed at
toporbottomcan also appear as synthetic rows on the node card.
For the meaning, defaults, limits and choices of every field in distributed packages, see the parameter catalog.
A stereotype parameter consists of an editable package selector and fields from that package's schema. The selector shows the name and exact id@version identity, applies any kind filter, and uses (choose package) when no package is selected. Choosing a package initializes its parameters to their defaults; an existing reference keeps its values. Type a reference/formula directly into the selector; its resolved nested values then remain read-only until explicitly replacing that reference, without editing the shared declaration. Literal-reference inner fields use editable menus or text according to their type. The project validates the selection and every changed field. If a value is invalid, the client reports the rejection and keeps the last confirmed values. Inspector data refreshes after an edit.
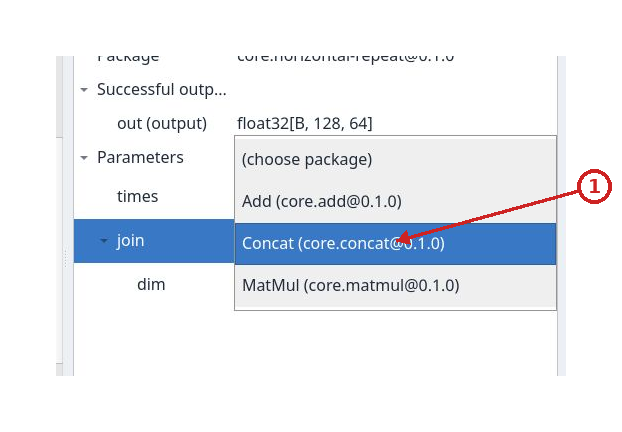
Click the image to inspect it at its original size.
- Available packages
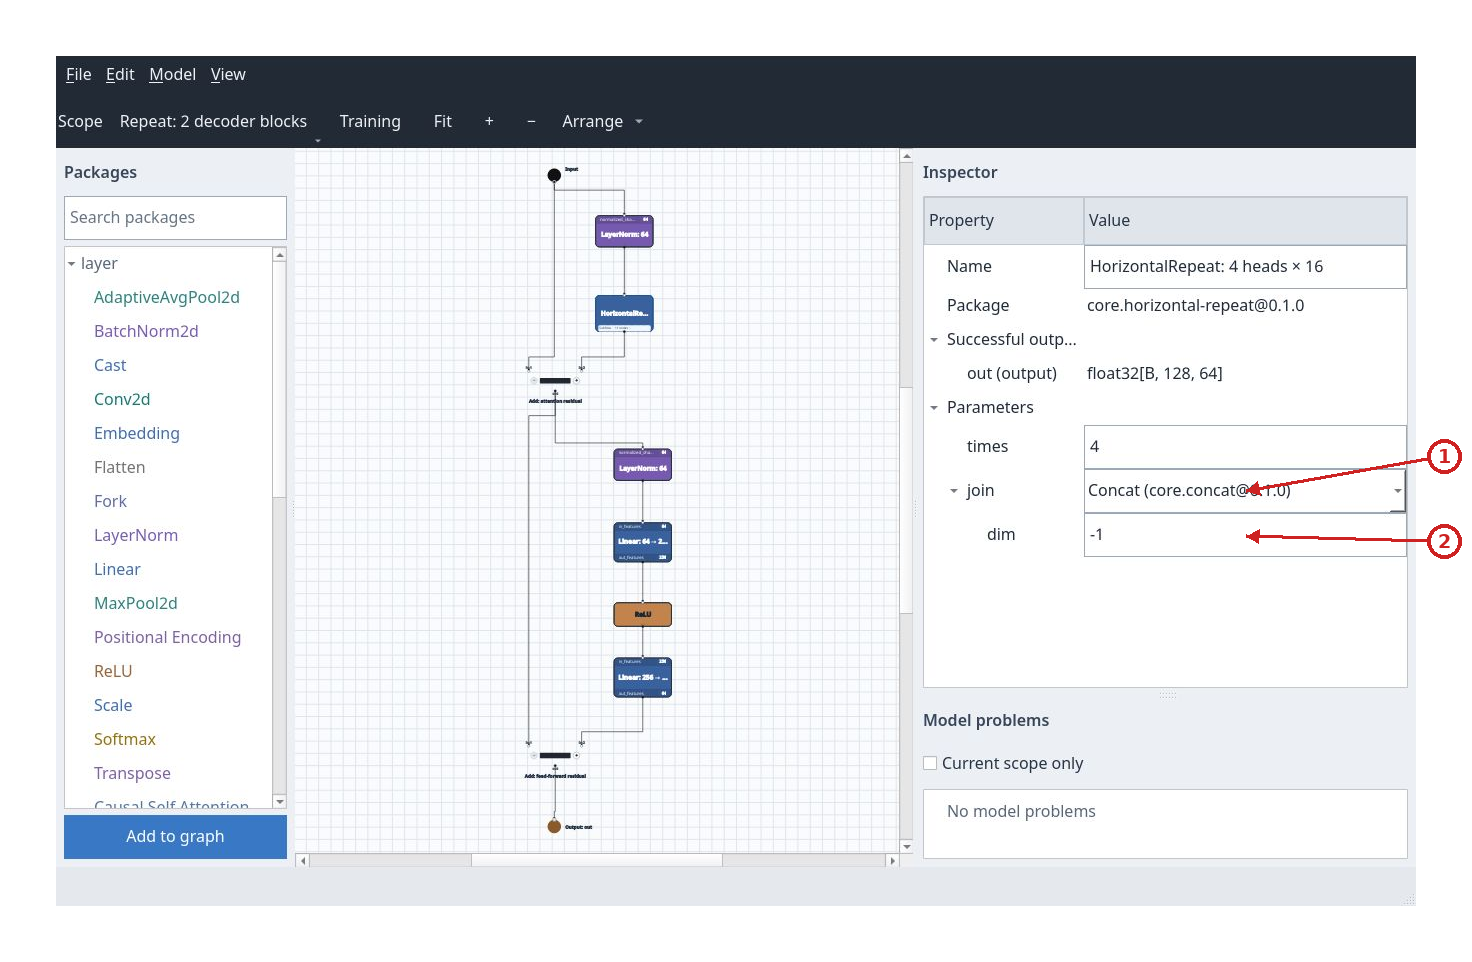
Click the image to inspect it at its original size.
- Referenced package
- Reference parameters
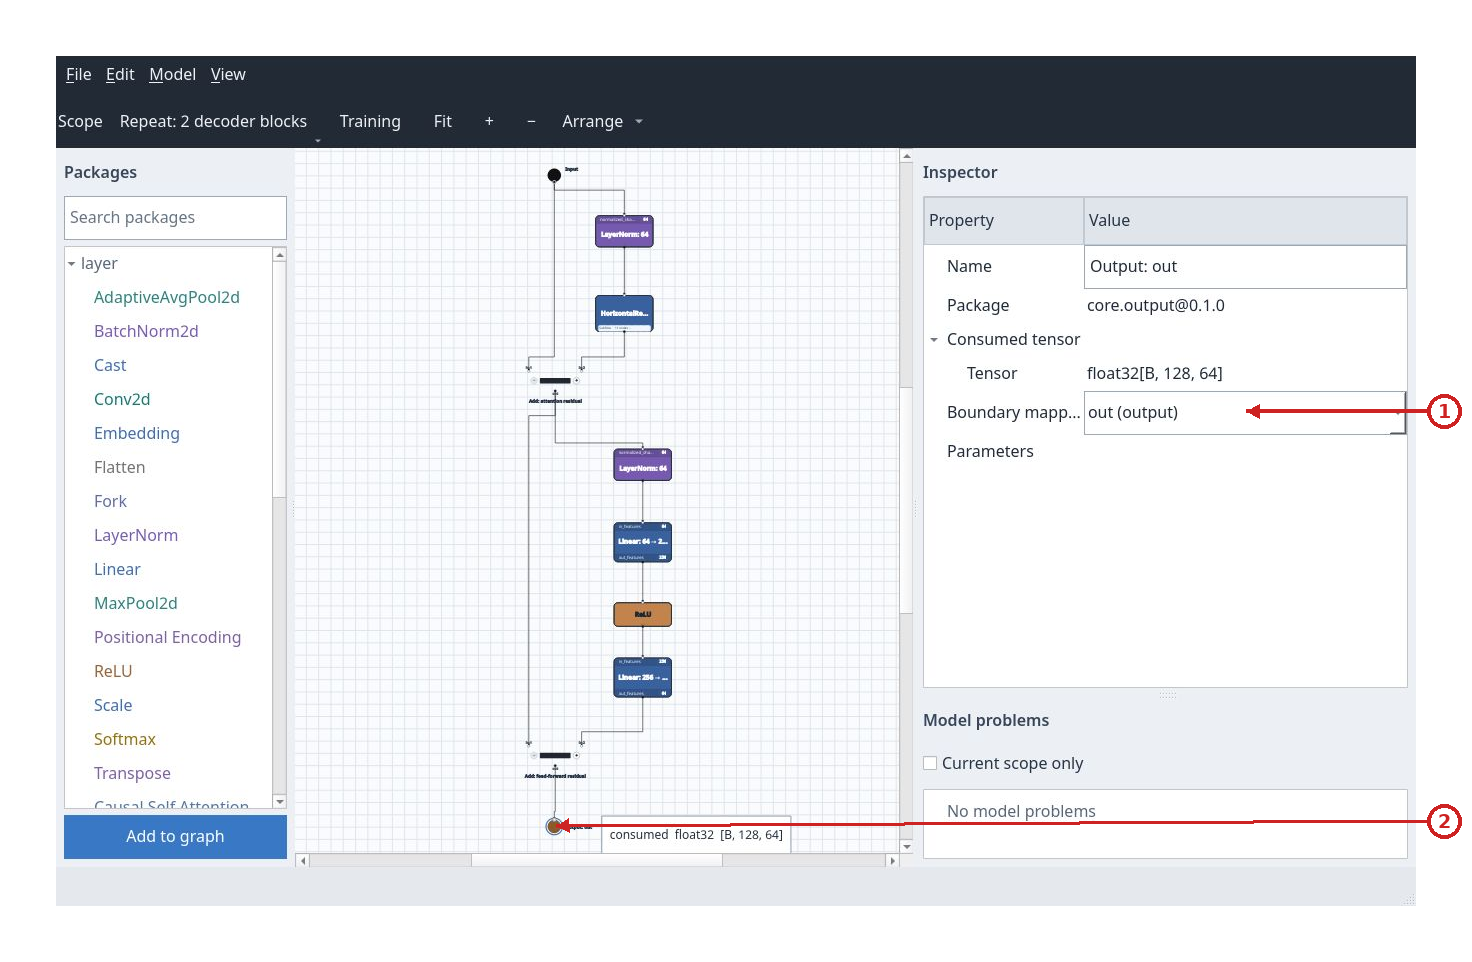
Click the image to inspect it at its original size.
- Boundary mapping selector
- Selected output boundary
Project resources and dataset selection
Project resources no longer occupies workspace space. Resource management remains available from the menus: Model > Create stereotype…, Dataset > Create dataset… and Dataset > Manage datasets…. See the dataset manager section for dataset details.
Model > Manage operations… opens the exported operations manager. Dataset > Manage datasets… opens the dataset manager; Dataset > Create dataset… creates a dataset.
Manage exported operations
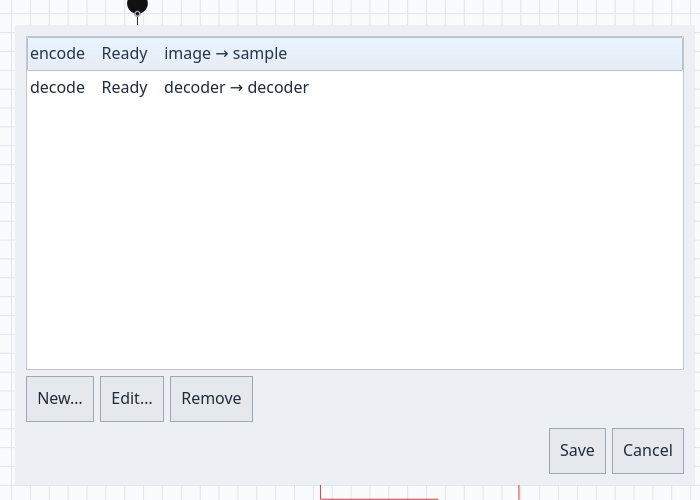
Model > Manage operations… opens Manage operations, the list of methods that will appear on the Python wheel. New… creates a method; Edit… changes the selected row; Remove deletes it. The list shows the name, endpoint status, and input and output nodes. The Operation form shows the current signature from graph analysis; it is informational because the Qt client does not execute Python operators.
The Operation form asks for Method name, input and output endpoints, a codec for each side, and Current signature. Names must be simple Python identifiers such as encode or decode. An input can use the output of a root Input node, or a root node's input handle; in the second case, the supplied tensor replaces the value from the existing connection for this operation without changing the saved graph. The output selects an existing output handle. The dataset codec calls the active adapter's tokenize or untokenize; tensor accepts or returns a batched PyTorch tensor.
Operations are saved in model.json with the project. Graph edits can make an endpoint invalid; Operations marks it so you can fix or remove the method. Save project and submit blocks submission while invalid references remain. After training, the wheel exposes each name as a method such as model.encode(value) or model.decode(tensor). model.infer(value) remains available. The VAE tutorial shows how to create both methods in the MNIST example.
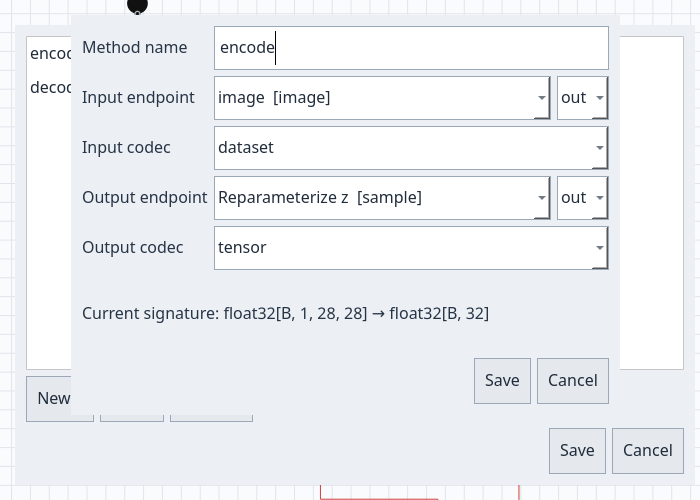
Click the image to inspect it at its original size.
Dataset manager
Dataset… / Manage datasets… opens Project datasets, a single-selection list. Each row shows id@version — name; the active dataset is marked ✓ (active). New dataset opens a blank form. Edit opens the selected dataset; clicking a row only selects it. Import dataset… copies a dataset directory into the project and asks for missing metadata; if the Python adapter is missing, it creates a scaffold that must be completed before training. The first imported dataset becomes active. Activate activates the selected dataset and synchronizes binding even when it is already active. A single dataset input automatically binds the sole root Input node; multiple root Input nodes produce an error. Edit, Activate and Delete… are disabled when no row is selected. Delete… asks for confirmation, permanently removes the selected dataset and its project files, and saves current project edits. Deleting the active dataset clears the active selection; existing bindings remain until another dataset is activated. Close closes the manager without further changes.
With one dataset input slot and one root Input node, binding is automatic
and read-only in the Inspector. Changing the dataset or renaming its slot
updates the binding. Opening a project with an old binding synchronizes it and
marks the project modified. Multi-slot datasets retain manual binding.
When the adapter returns exactly one input, the runtime associates it with the
sole declared slot even when its returned name differs. This applies to train,
validation, test and tokenization; targets are not renamed. Incompatible input
counts fail explicitly.
Create or edit a dataset
Create dataset — saves project contains ID, Version, Name, Description and the initially checked Select this dataset after creation box. The edit form is titled Edit dataset — saves project: ID and Version are locked and the selection box is not shown.
The Input slots and Target slots tables have Slot name, Dtype and Shape columns. For each row, enter a unique name, a dtype from float16, bfloat16, float32, float64, int8, int16, int32, int64, uint8, bool, and comma-separated dimensions. The symbolic dimension B represents the batch; other dimensions must be positive integers. A shape can have 1 to 64 dimensions. Each new row starts with dtype float32 and shape B. Add row adds a row; Remove row removes only the selected row. At least one input slot is required; target slots may be empty.
Create and save project creates the resource and saves the project; in edit mode the button is Save changes. Cancel closes without applying the fields. Errors appear in the form, which remains open so you can correct them. Editing a dataset changes only the displayed name, description and slots; it preserves the ID/version, Python adapter, data and metadata not shown in the form.
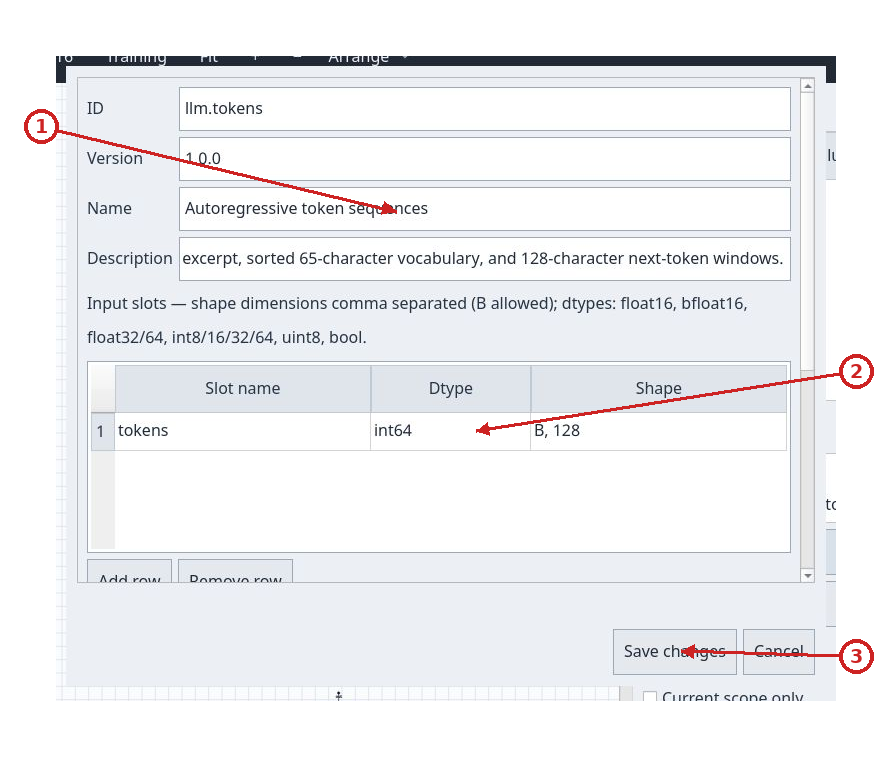
Click the image to inspect it at its original size.
- Dataset ID, version, name and description
- Input slot name, dtype and shape
- Save changes or cancel
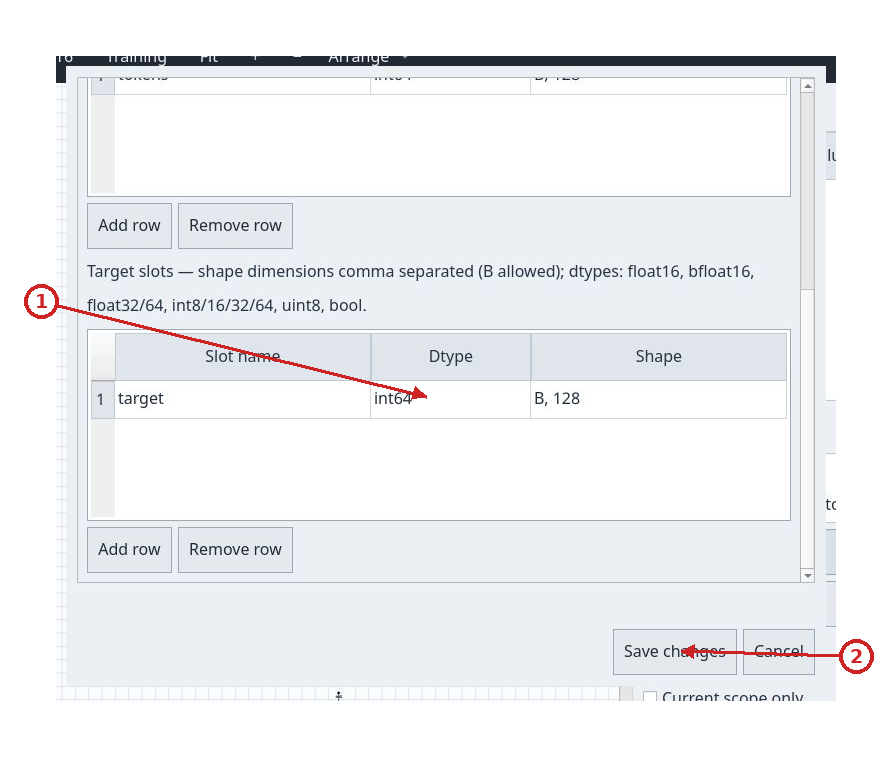
Click the image to inspect it at its original size.
- Target slot name, dtype and shape
- Save changes or cancel
Create a stereotype
Create stereotype — saves project opens from Model > Create stereotype…. Its initial fields are ID, Version (default 1.0.0), Name, Description, Kind and Color (default #6b8fc4). Kind offers input, layer, join, loss, output, loss-output and subflow.
The metadata fields have distinct meanings in both the stereotype and dataset forms:
| Field | Description |
|---|---|
ID |
Technical resource identity. Project references use it with the version. It must follow the syntax accepted by the creator. |
Version |
Resource version; distinguishes definitions that share an ID. |
Name |
Readable name shown in catalogs and lists. |
Description |
Text describing the resource's purpose and use. |
Kind |
Node role in the graph; determines its display and connection rules. |
Color |
Color of the palette item and card; use a hexadecimal value such as #6b8fc4. |
Kind choice |
Use |
|---|---|
input |
Source of a scope's input tensors. |
layer |
Tensor transformation, such as a neural layer. |
join |
Combines multiple inputs; the canvas provides dynamic handles. |
loss |
Computes an objective exposed as a loss output. |
output |
Terminal that consumes a prediction. |
loss-output |
Terminal that consumes a loss objective. |
subflow |
Container for a navigable inner graph. |
Use explicit output handles instead of defaults enables the Output ID / Type (output or loss) table. Add output row creates a row (initial type output); Remove output row removes the selected row. Explicit definitions replace implicit outputs. Without an override, the caption shows the defaults: a normal out of kind output, a loss handle of kind loss for kind loss, and no outputs for output and loss-output. At most one output of each kind is allowed. IDs must be nonempty and unique; terminal nodes cannot declare outputs.
Key is the technical parameter name shown in the Inspector; Default is the initial value for new nodes; Minimum sets the lower bound for numeric values. Minimum is supported only for integer and number, must be finite, and cannot exceed the default. Integer values cannot have a fractional part. Type determines the control and validation, while Choices is supported only for string and dtype; when choices are supplied, the default must be one of them.
Parameters is a table with Key, Type, Default, Minimum, Choices (comma separated), Position and an untitled column. Types are boolean, integer, number, string, dtype and JSON arrays. The default must match the type; Minimum must be finite. Choices are comma-separated values and produce a menu in the node Inspector. Position may be empty, top or bottom; the latter two show the key and value on the node card. Add parameter row adds a row with initial type number and value 0; Remove selected row removes the selected row. The untitled final column is ignored. Use the horizontal scrollbar to reach it; it is not an additional setting.
Dependencies contains Package ID and Version constraint. The package ID identifies the required resource; the constraint selects compatible versions, for example 0.1.0 or ^0.1.0. Add dependency adds a row with initial constraint 0.1.0; Remove dependency removes the selected row. IDs and constraints must be nonempty, and IDs must be unique. The project must be able to resolve every dependency.
Optional Lua inference contains the source editor. Its initial text is an explicit pass-through rule: it returns the first input and reports when one is missing. Replace it with a valid Lua rule; the client shows errors beside the editor and highlights a line when available. Create and save project validates and saves the stereotype and project; Cancel cancels the form. A field or Lua error leaves the entered values open for correction.
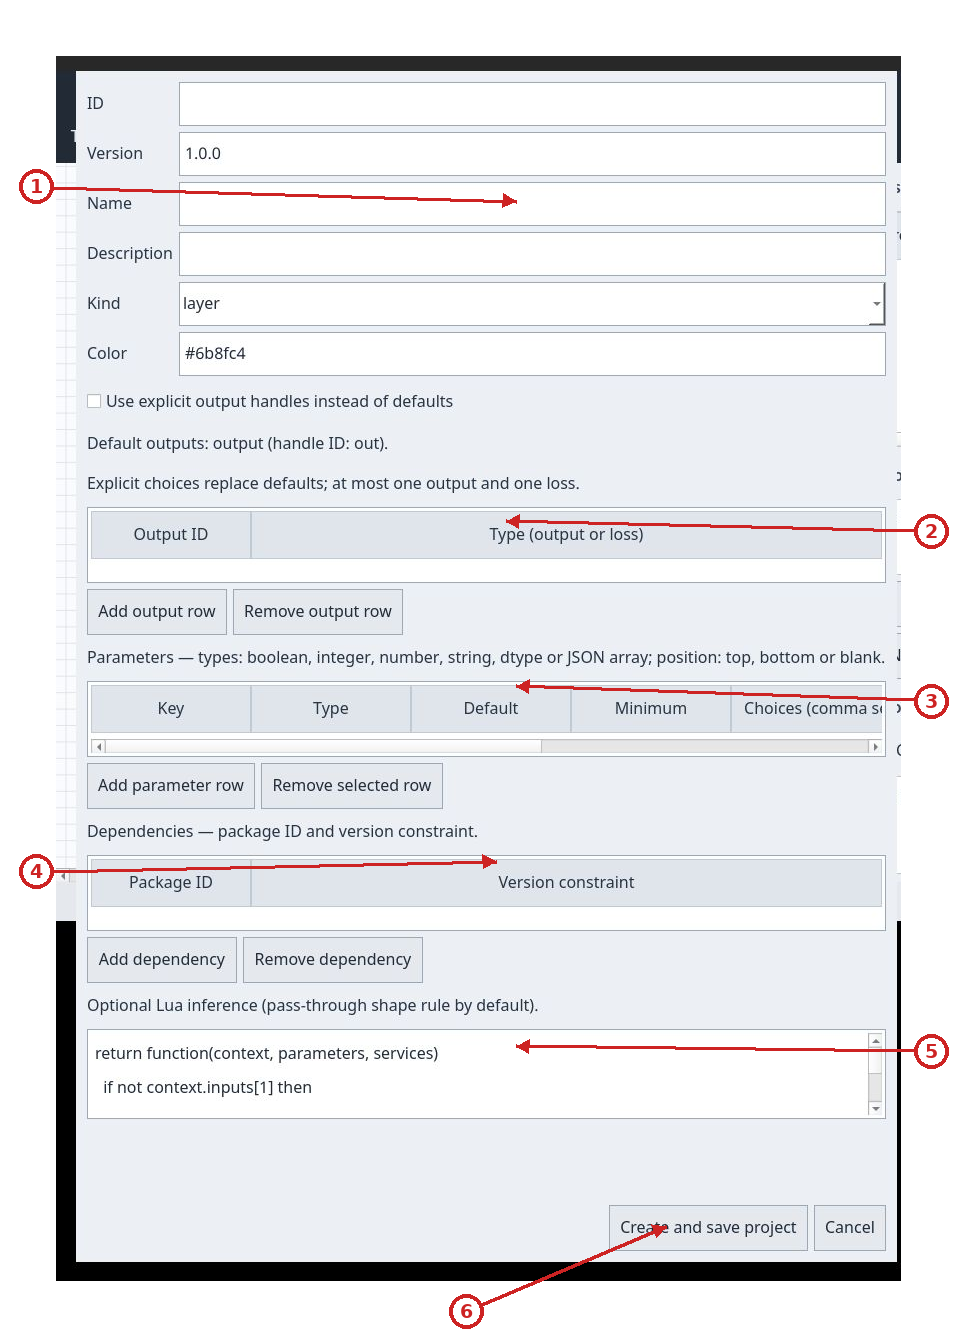
Click the image to inspect it at its original size.
- ID, version, name, description and kind
- Explicit output handles
- Parameter schema
- Package dependencies
- Optional Lua function
- Create and save project
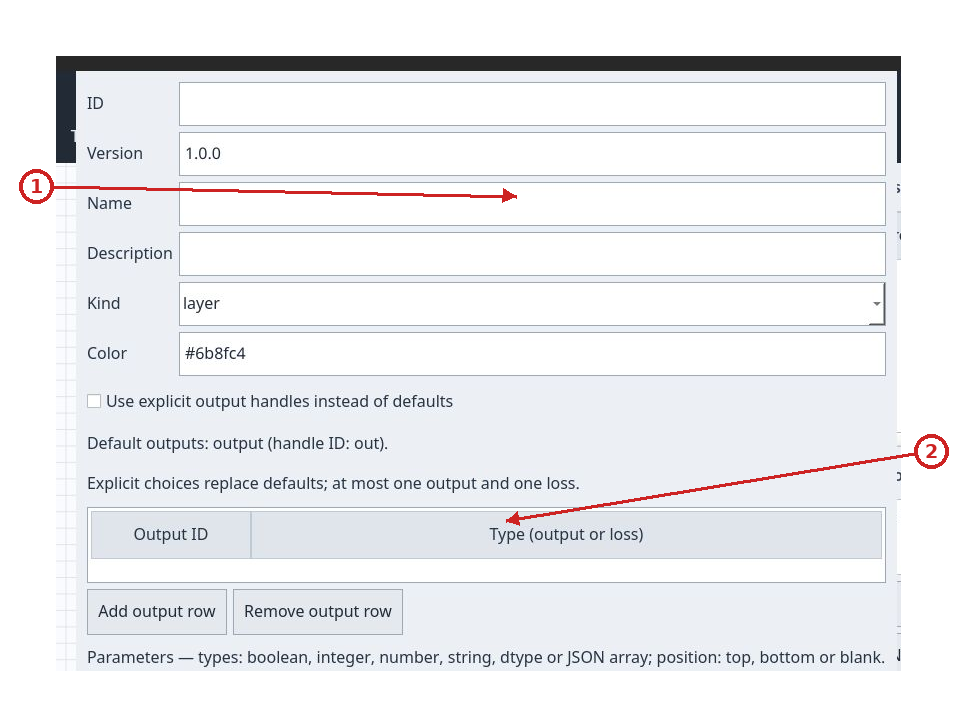
Click the image to inspect it at its original size.
- ID, version, name and description
- Kind, color and outputs
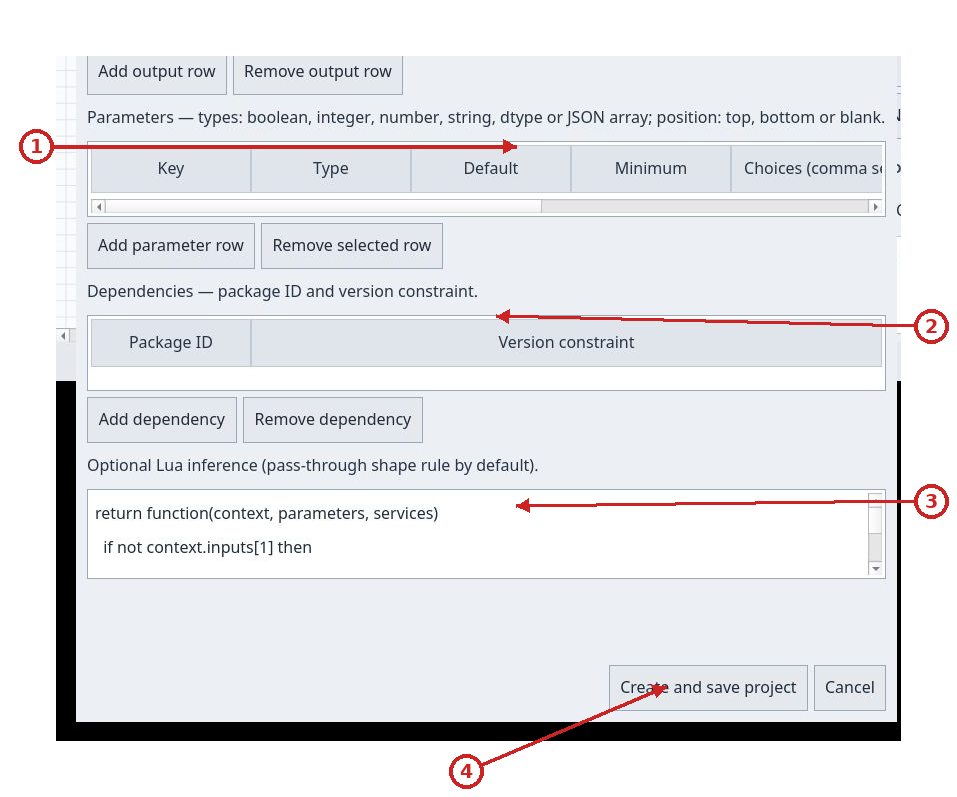
Click the image to inspect it at its original size.
- Parameter schema
- Package dependencies
- Optional Lua function
- Create and save project
Model problems
Problem roots are ordered by graph depth: sources first, then downstream nodes.
Equal depths retain stable model order, including sources added after older
layers. The general Root summary stays last; blocked descendants remain
grouped under their cause.
Model Problems starts closed. Its tab shows global error, warning and internal-problem counts independently of the scope filter; each reported problem contributes once, including blocked descendants and the Root problem. Open the tab to see a table with category, node, scope and reason columns. It lists shape-analysis problems, not successful rows.
Categories distinguish Lua compilation error, Model error, Incomplete and Analysis unavailable by icon, text and color. Primary causes are grouped; blocked descendants appear as expandable child rows. When available, Technical details opens stable codes, source file/line or technical details.
Current scope only filters the list to the displayed scope and keeps an outside cause visible as context when needed. Clicking a navigable problem selects and centers its node, switching to its scope. The Root problem reports missing or invalid root terminals and does not navigate to a node. If analysis failed, Analysis unavailable remains visible with expandable technical details; the model is not presented as problem-free. Nodes with problems also show a small canvas marker.
Training backend
Training on the toolbar and Model > Training backend… open Training backend. You can connect and inspect jobs without a project; submitting a job requires a valid project, which is saved before submission.
Configure and start the local backend
Press Configure backend… in the Training dashboard. The separate Local backend service configuration window opens; the dashboard with its connection, controls, history and curves stays usable. Choose Docker-compatible runtime or SSH / Slurm. Slurm needs a configured SSH alias, a writable remote directory and a prepared Singularity .sif image. Partition and SSH alias start blank; CPU, memory, time and GPU fields have generic defaults. The shared profile is ~/.config/nnmodelling/config.json, overridable with NNMODELLING_CONFIG. The app does not collect SSH passwords or build images and dependencies.
Press Save settings and start local backend. The UI starts FastAPI on loopback as a separate local process; with SSH / Slurm, only workers are sent to the cluster. uv and the repository workspace must be available, and the worker image must be prepared first. The configuration window shows startup and runtime availability errors; the dashboard then checks the service with Connect / check health. Non-secret settings are saved for the current user; Bearer token stays in memory for the session. When connected to a manually started service or remote endpoint, the UI does not manage it. See the illustrated Slurm backend guide.
When the managed service is already running, the button changes to Restart local backend safely. The UI refuses to restart while job history contains queued or running jobs, avoiding training interruption. Closing the Training panel leaves the service running. Closing the app while its managed service is active shows a warning: confirming stops the backend and interrupts any Slurm jobs; canceling keeps the app open.
At the top, Endpoint starts at http://127.0.0.1:8765 for a manually started service. The app-managed backend reserves an available loopback port and fills this field automatically. Bearer token is optional, hidden as you type and kept in memory for the session. Connect / check health checks the service and runtime; Refresh jobs updates history. The status line reports the result in readable form.
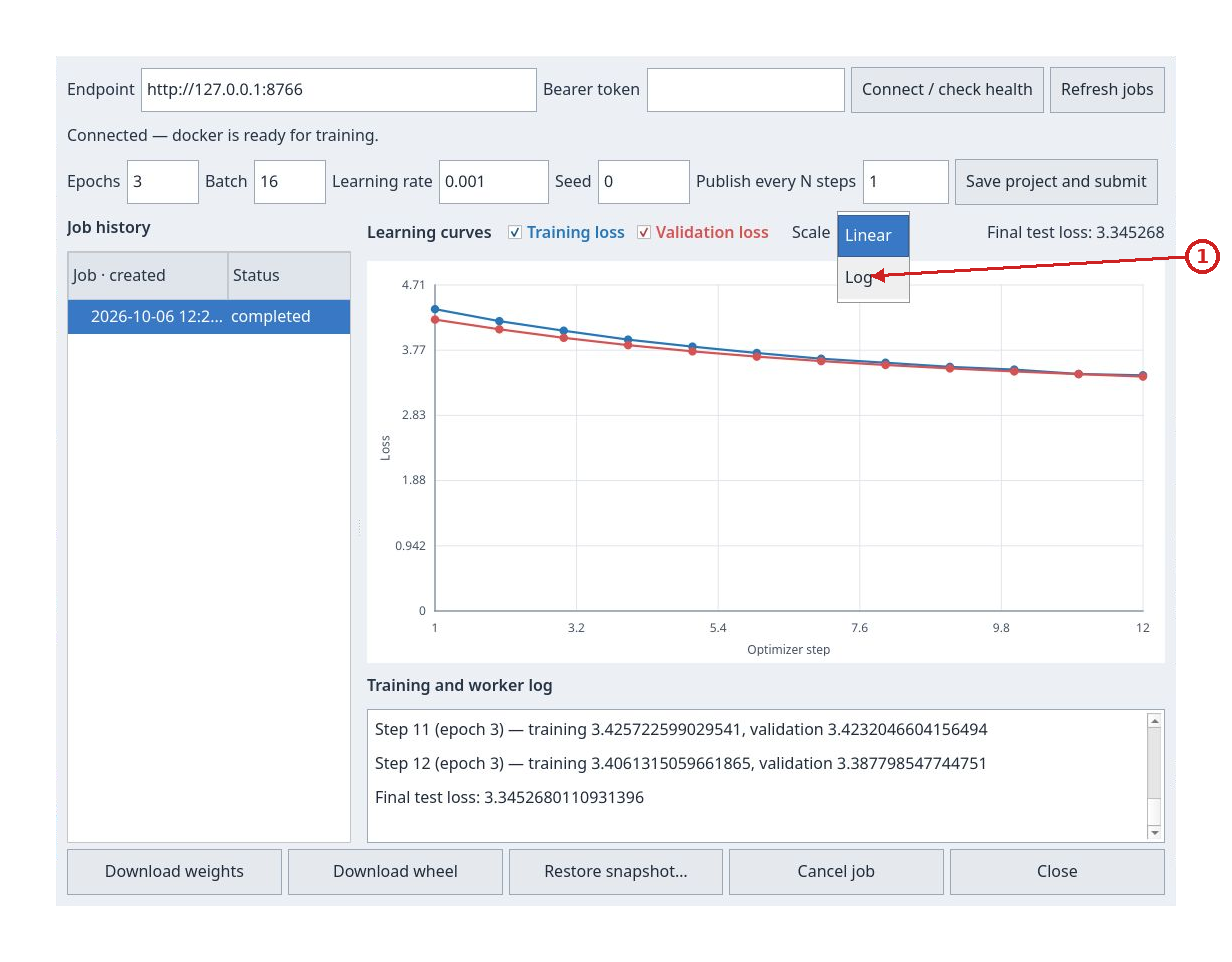
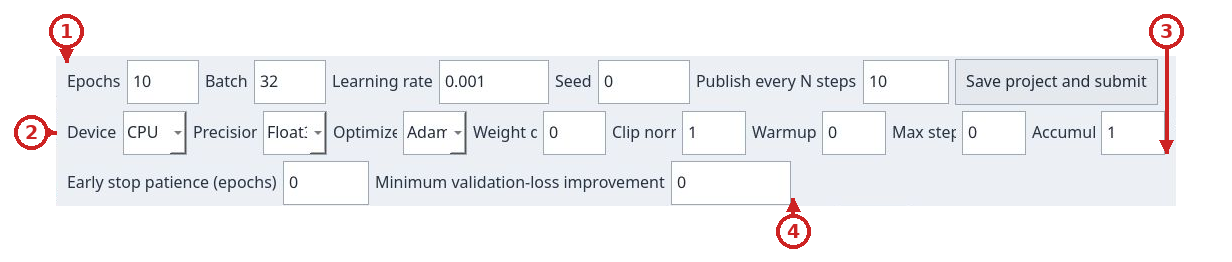
Submission fields are Epochs (10), Batch (32), Learning rate (0.001), Seed (0) and Publish every N steps (10). Epochs: 1–10000; batch: 1–4096; learning rate: greater than zero and at most 1; seed: −2147483648 to 4294967295; publish interval: 1–100000. The interval controls metric publication and validation. Save project and submit saves the current state first, then submits an immutable snapshot; a save or submission error appears in the status line.
Job history shows abbreviated date/time, ID suffix and status; its tooltip shows the full ID and date. Selecting a job loads its details and curves. The list refreshes every 2.5 seconds. Learning curves displays Training loss and Validation loss, both enabled initially, on the same loss axis. Scale chooses Linear or Log. The horizontal axis is Optimizer step for new published points and Epoch for historical metrics that have no step points. Final test loss remains pending until the job finishes with a valid value.
Training and worker log reports status, any error, metrics and final test loss. The bottom controls are Download weights, Download wheel, Restore snapshot…, Cancel job and Close. Downloads require a completed job and save the selected file through the system dialog. Restore snapshot… recreates a copy in a new folder chosen by the user, opens it as a project and does not overwrite an existing folder. Cancel job requests cancellation of the selected job. Close closes the panel.
New wheels use distribution nnm_<normalized-project-id>; for example, project
ID llm produces nnm_llm-0.1.0-py3-none-any.whl. The public Python module in new wheels matches the distribution,
nnm_<normalized-project-id>; for ID llm, use from nnm_llm import Model.
A job-specific alias remains for compatibility. Inspect historical wheels for
their original import. Jobs
from projects with the same normalized ID share a distribution name and
version; install their wheels in separate Python environments. Previously
stored wheels keep their original names and contents.
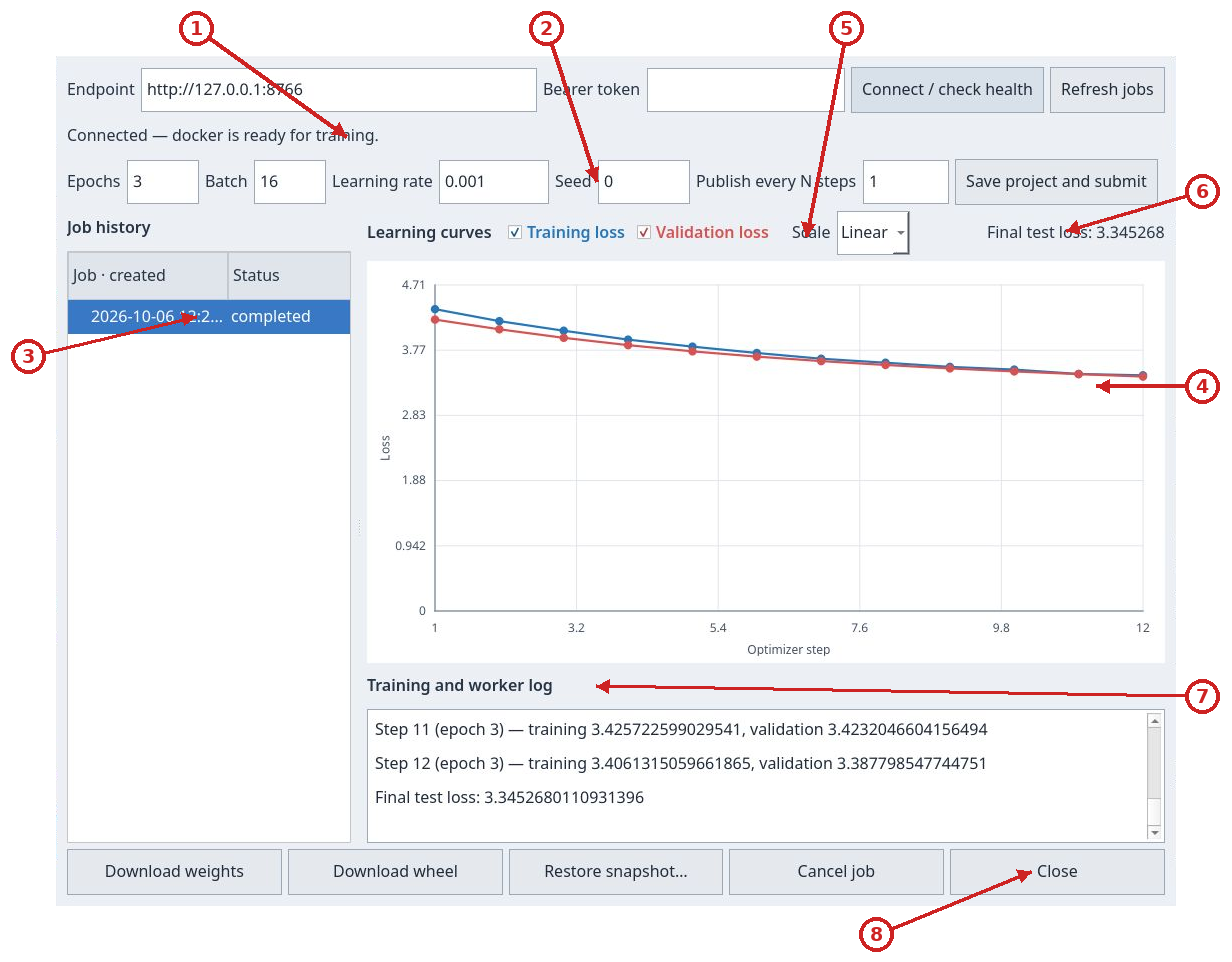
Click the image to inspect it at its original size.
- Backend connection
- Training configuration
- Job history and status
- Training and validation loss curves
- Curve visibility and scale
- Final test loss
- Training and worker log
- Download, restore, cancel and close actions
Click the image to inspect it at its original size.
Click the image to inspect it at its original size.
- Linear or logarithmic curve scale
Advanced training options
Click the image to inspect it at its original size.
- Epochs, batch, learning rate, seed and metric cadence
- Device, precision and optimizer
- Weight decay, clipping, warmup, step budget and accumulation
- Early stopping patience and minimum validation improvement
| Field | Initial value | Meaning |
|---|---|---|
Device |
CPU |
CUDA requires an available GPU and never silently falls back to CPU. For Slurm also configure the backend GPU count. |
Precision |
Float32 |
BFloat16 enables mixed precision; master weights and sensitive operations remain FP32. |
Optimizer |
Adam |
Alternatively DeepSeek Muon, with AdamW for excluded/non-matrix parameters. |
Weight decay |
0 |
Optimizer regularization. |
Clip norm |
1 |
Positive gradient norm limit (at most 1,000,000). |
Warmup |
0 |
Optimizer updates used to ramp up learning rate. |
Max steps |
0 |
0 runs all configured epochs; a positive value caps optimizer updates. |
Accumulation |
1 |
Batches accumulated per optimizer update. |
Early stop patience (epochs) |
0 |
0 disables early stopping; otherwise caps consecutive epochs without a sufficient validation improvement. |
Minimum validation-loss improvement |
0 |
Improvement in loss units required to reset patience. |
With early stopping enabled, comparisons happen at epoch boundaries. The worker retains each validation-loss minimum and restores those weights before final test and export, including when the configured budget ends. Patience and the threshold determine when to stop, while the lowest validation loss determines exported weights. Logs and metrics distinguish budgets, updates and processed tokens. A small budget is not full-corpus completion. For light trials keep CPU, Float32, Adam and early stopping disabled.